Introduction
In today’s digital world, customization has become a powerful way to create unique and realistic designs. One such trending demand is creating a scannable novelty ID card that looks professional and functional for entertainment, props, or collectible purposes.
Whether you’re designing for fun, film production, or novelty collections, understanding the process step by step ensures high-quality results. In this guide, we’ll walk you through how to customize your scannable novelty ID card from scratch — even if you’re a beginner.
Step 1: Understand the Purpose of Your ID Card
Before starting, define why you’re creating the ID card:
- Personal novelty use
- Movie or prop design
- Collectible item
- Graphic design portfolio
Knowing the purpose helps determine design elements, data structure, and realism level.
Step 2: Choose the Right Design Software
To create a professional-looking ID, you need the right tools. Popular options include:
- Adobe Photoshop (for detailed design)
- Adobe Illustrator (for vector layouts)
- Canva (for beginners)
- CorelDRAW (for advanced designers)
If you want high precision, Photoshop or Illustrator is recommended.
Step 3: Select a High-Quality Template
A strong template is the backbone of your design. Look for:
- Correct dimensions (CR80 standard: 85.6mm x 54mm)
- Proper alignment guides
- High-resolution (300 DPI)
You can either:
- Create your own template
- Download editable PSD or AI files
Step 4: Add Personal Information Carefully
Now comes the customization part. Insert realistic but fictional details:
- Full Name
- Date of Birth
- Address
- ID Number
- Expiry Date
Make sure:
- Fonts match the template style
- Spacing and alignment are accurate
- No spelling errors
Step 5: Upload and Edit Photo
Your ID photo is the most noticeable element.
Tips:
- Use a clear, high-resolution image
- Maintain proper lighting
- Remove background (use tools like remove.bg)
- Resize to fit the ID frame
Ensure the photo looks natural and blends well with the card.
Step 6: Customize Design Elements
Enhance the card using:
- Logos and seals
- Background patterns
- Hologram-style overlays
- Microtext and fine lines
These elements add realism and professionalism.
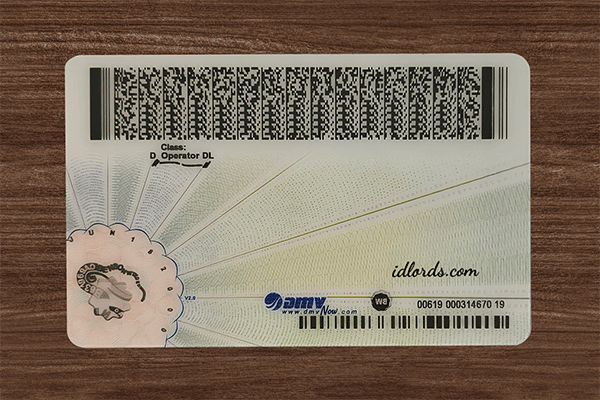
Step 7: Generate Scannable Barcode or QR Code
This is the most critical step for a scannable ID card.
Options:
- Barcode (Code 128 or PDF417)
- QR Code
How to do it:
- Use a barcode generator online
- Input encoded data (name, DOB, ID number)
- Download high-resolution code
- Place it correctly on the card
Ensure the code is:
- Not stretched or distorted
- Clearly visible
- Tested with a scanner app
Step 8: Add Security Features
To make your ID look realistic, include:
- UV elements (for advanced prints)
- Transparent overlays
- Ghost images (faded duplicate photo)
- Signature strip
These small details significantly improve authenticity.
Step 9: Final Alignment and Proofreading
Before exporting:
- Double-check all text
- Align elements perfectly
- Ensure margins are consistent
- Zoom in to check pixel quality
Even minor errors can reduce the quality.
Step 10: Export and Print Properly
Export settings:
- Format: PNG or PDF
- Resolution: 300 DPI
- Color mode: CMYK (for print)
For printing:
- Use PVC card printers (best quality)
- Or print on high-quality paper and laminate
Pro Tips for Better Results
- Use real-world references for inspiration
- Avoid over-designing
- Maintain consistent typography
- Always test scan functionality
- Keep backup files
Common Mistakes to Avoid
- Low-resolution images
- Incorrect barcode placement
- Misaligned text
- Overcrowded design
- Ignoring print settings
FAQs
1. What is a scannable novelty ID card?
A scannable novelty ID card includes a barcode or QR code that can be scanned to display encoded information.
2. Can I create a scannable ID without design skills?
Yes, tools like Canva and online templates make it easy for beginners.
3. Which barcode is best for ID cards?
PDF417 and Code 128 are commonly used for ID cards.
4. How do I test if my ID is scannable?
Use mobile barcode scanner apps to verify the encoded data.
5. What resolution is best for printing ID cards?
300 DPI is ideal for high-quality printing.
Conclusion
Customizing a scannable novelty ID card is both an art and a technical process. By following this step-by-step guide, you can create a professional and realistic design that stands out.
From choosing the right template to generating a functional barcode, every step plays a crucial role. With practice and attention to detail, you’ll be able to produce high-quality novelty ID cards that look authentic and polished.